Document SOP-ST-01 · Rev 2.0 · Tech Department

Setup Team
Standard Operating Procedure

The complete procedure for every POS installation — from the moment sales closes a deal to the post-setup follow-up. One flow, one standard, every customer.

Before Setup Setup Day After Setup
01

The Team

NameRoleStation / Region
SydneySetup SupervisorHQ
AinAssistant Supervisor · Setup AdminHQ
RaynardTechnicianKK
KhongTechnicianKK
LouisTechnicianKK
ZukiTechnicianSDK
HasmirTechnicianTWU
LuqmanTechnicianKL
KhalidStock KeeperWarehouse
02

Setup Workflow

Phase A — Before Setup
Intake & Admin
  1. Sales closes the deal. Quotation issued; on deposit or full payment, sales submits the Setup Form.
  2. WhatsApp group created by sales for the customer — CS & Setup Team invited, Ain tagged.
  3. Ain verifies the Setup Form and payment records, then converts QT → Invoice once a valid deposit/payment exists.
  4. Request license info from customer (Template 1) plus SSM Certificate or Trading License.
  5. F&B customers: send the Menu Import Policy (Template 2) and collect the finalized menu.
  6. Register the license.
Phase B — Before Setup
Scheduling & Hardware Prep
  1. Schedule the appointment — onsite or online. Send the Setup Confirmation (Template 3) and wait for the customer's YES.
  2. Ain records everything on the Setup Form and sets the technician's calendar.
  3. Hardware check: Ain sends (or Khalid refers to) the Invoice to identify hardware to prepare.
  4. Preset the hardware — stock team or technician configures and tests every unit before going onsite. Apply the "Setup team ready" sticker.
  5. Reminder 1–2 days before (Template 5) — technician sends it; Ain assists when needed. Slots: 10 AM / 2 PM.
Phase C — Setup Day
Onsite Installation
  1. Arrive on time. If delayed, apologize in the customer group before the slot.
  2. Install and verify all hardware and the POS system on site.
  3. Train the customer on daily operations.
Reminder: late reschedules after the technician arrives incur RM 100.
Phase D — After Setup
Close-out
  1. Consent form — have the customer sign.
  2. Photos & video of the training — upload as proof and send to the customer group with a summary of what was covered.
  3. Update the group description after setup.
  4. Request a Google review — ask the customer to rate on Google Maps, with images.
03

Message Templates

Copy, fill the blanks, send. Do not improvise wording for policies or charges.

Template 1
License Registration Request
Please provide info as below for license registration Company name: Company Register no: SST NO: Address: Post code: Contact person: Mobile Phone: Email address: Kindly take note to also send the SSM Certificate or Trading License. Thank you.
Template 2
F&B Menu Import — Pricing & Policy
F&B Menu Import - Pricing & Policy Menu Import Charges: * Initial Setup (1st 200 items): FREE * Beyond 200 items: RM 200 per 200-item block Menu with 201-400 items = RM 200 Menu with 401-600 items = RM 400 And so on... * Additional Items (Existing Users): Same pricing applies Adding up to 200 items = RM 200 Example: Adding 60 new items = RM 200 Adding 265 new items = RM 400 Image Upload Service: - Uploading item images: RM0.60 per image uploaded Important Notes: Please ensure the menu provided is FINALIZED before submission. Any adjustments or modifications requested after the initial import that differ from the finalized menu will incur an additional charge. For existing customers requesting menu additions or updates, the same 200-item block pricing applies. To avoid extra costs, please confirm all menu details, items, descriptions, and pricing before sending to us.
Template 3
Onsite Setup Confirmation (EN / BM / 中文)
Hello @Customer, Your onsite setup and training has been scheduled for: - Date: DATE - Time: 10AM / 2PM - Technician: @TECHNICIAN Please ensure that the necessary preparations, such as electrical work or equipment, are in place before the scheduled appointment. Important: Late requests to reschedule will incur a RM100 charge if the technician has already arrived on site. If you have any questions or need to make adjustments, feel free to reach out. Looking forward to assisting you! Reply " YES " to confirm your appointment, or " NO " if you are not able to attend. — Sila rujuk maklumat di atas untuk jadual pemasangan sistem dan latihan. Sila pastikan semua keperluan seperti pemasangan elektrik atau peralatan-peralatan elektrikal yang lain telah disediakan terlebih dahulu sebelum temujanji dijadualkan. Sila ambil maklum sekiranya temu janji pada tarikh tersebut ditunda semasa technician kami telah sampai di lokasi anda, maka caj sebanyak RM100 akan dikenakan. Sekiranya anda mempunyai sebarang pertanyaan atau ingin membuat perubahan terhadap masa yang telah ditetapkan, sila hubungi kami. Sekian dan terima kasih Untuk pengesahan appointment, sila balas YA / TIDAK — 现场安装与培训的时间安排请参考以上信息。 请确保电力及所需设备已准备好,以便技术人员顺利完成安装。 重要提示: 若技术人员已到场且因准备不足需要改期,将收取 RM100 改期费用。 请回复 " YES " 以确认,或 " NO " 表示无法出席。
Template 4
Online / Other Training Confirmation
Hello, Your online/onsite training session has been scheduled for: - Date: DATE - Time: TIME - Technician: TECHNICIAN Please ensure you have a stable internet connection and all necessary materials ready prior to the session. If you have any questions, feel free to reach out. Looking forward to your participation!
Template 5
Setup Reminder (1–2 Days Before)
Hi, boss @ . Just a reminder that our system installation and training session is scheduled for 10am today/tomorrow. If there is any need of reschedule please let us know in advance, thanks.
04

WhatsApp Group Standard

Every customer group follows one naming format so CS and customers can search by group, location and POS system — and always know the dealer. Put the billing name in the group description for easy billing.

Group Name Format
Naming Convention
(Company Name). T Tech. (Location Area). (State). (FeedMe POS, BookIt, AutoCount, etc)
Example  Aliang Fish Noodles. T Tech. Lintas. Sabah. FeedMe POS
Status markers (prefix in group name):
@Support has ended
%Needs extra-care customer
Template 6
Group Description Info

Setup team inserts this in the group description so CS can gather info quickly during service.

Device: Redmi Tablet System mode: FeedMe POS System Router: (SSID & password) T Tech Router IP: 192.168.123.1 Printer model: Zywell Printer IP: Cashier: 192.168.123.181 Beverage: 192.168.123.182 Kitchen: 192.168.123.183 Remarks:
05

Router Preset — IP Address Setup

Done during hardware preset, before going onsite (TP-Link routers).

Step 1
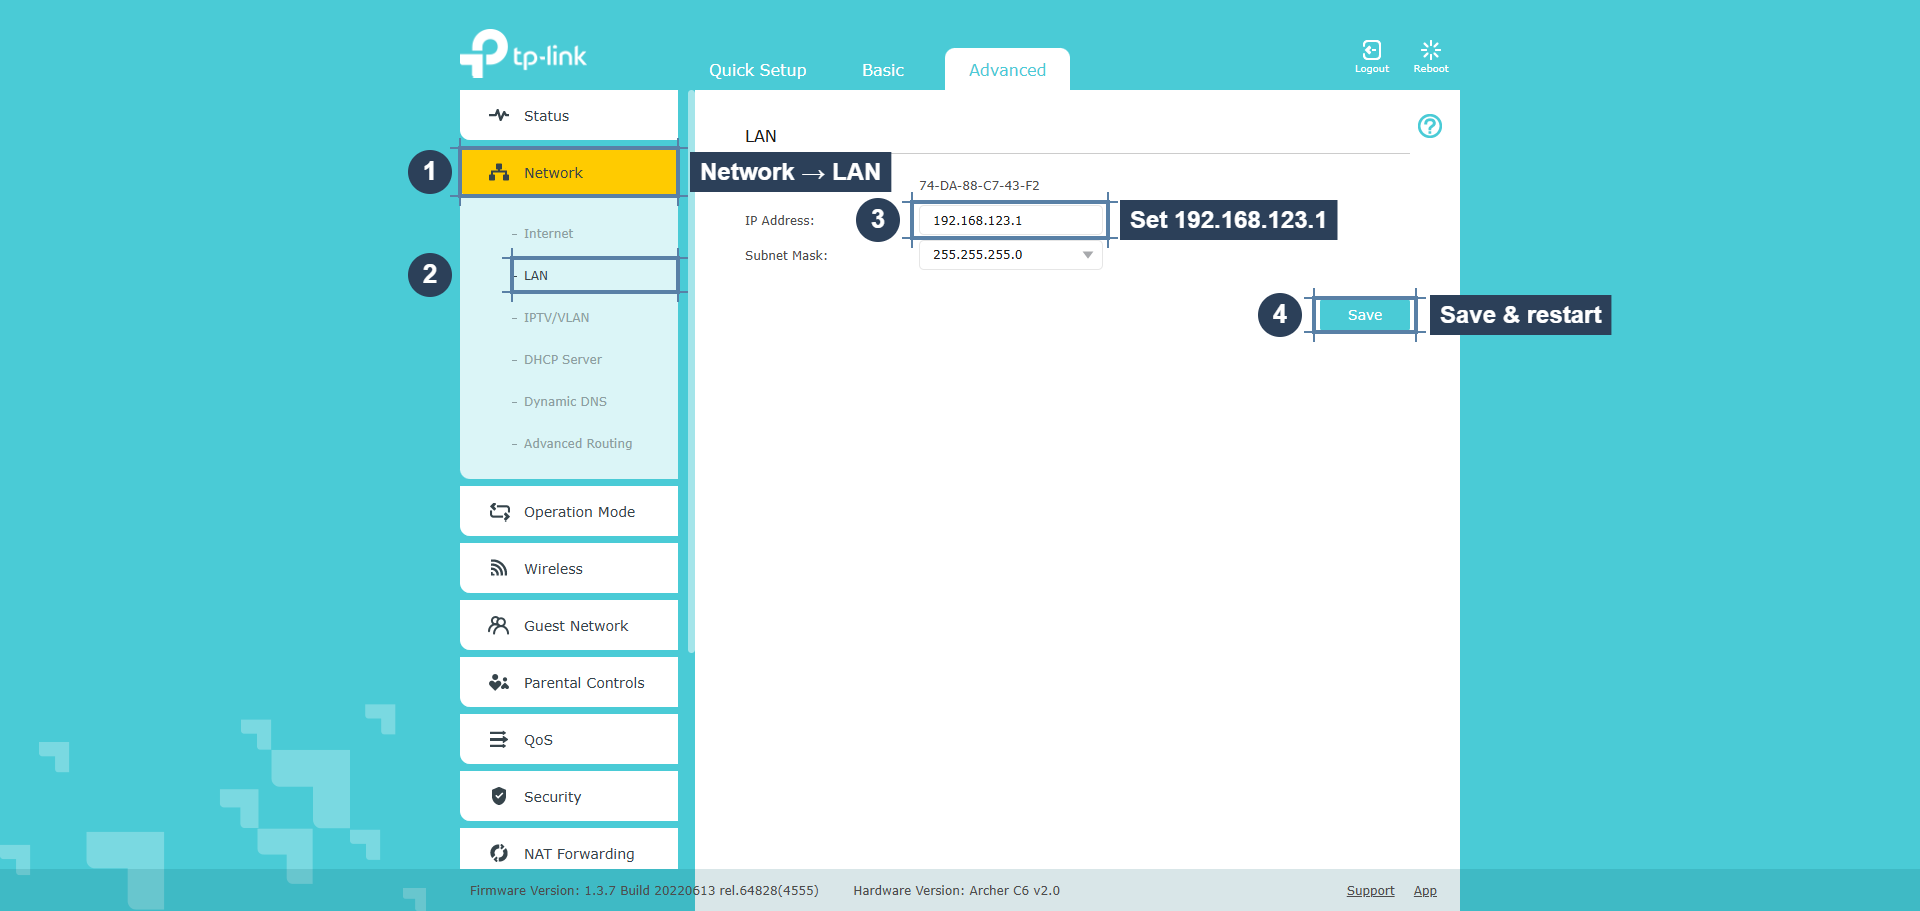
Change the Router IP
  1. Connect to the TP-Link router WiFi and note its IP address (usually 192.168.0.1).
  2. Open the IP in a browser and log in. Password: Ojmart9900@ (follows WiFi password).
  3. Change the router IP from 192.168.0.1 to 192.168.123.1, save and restart, then reconnect.
Step 2
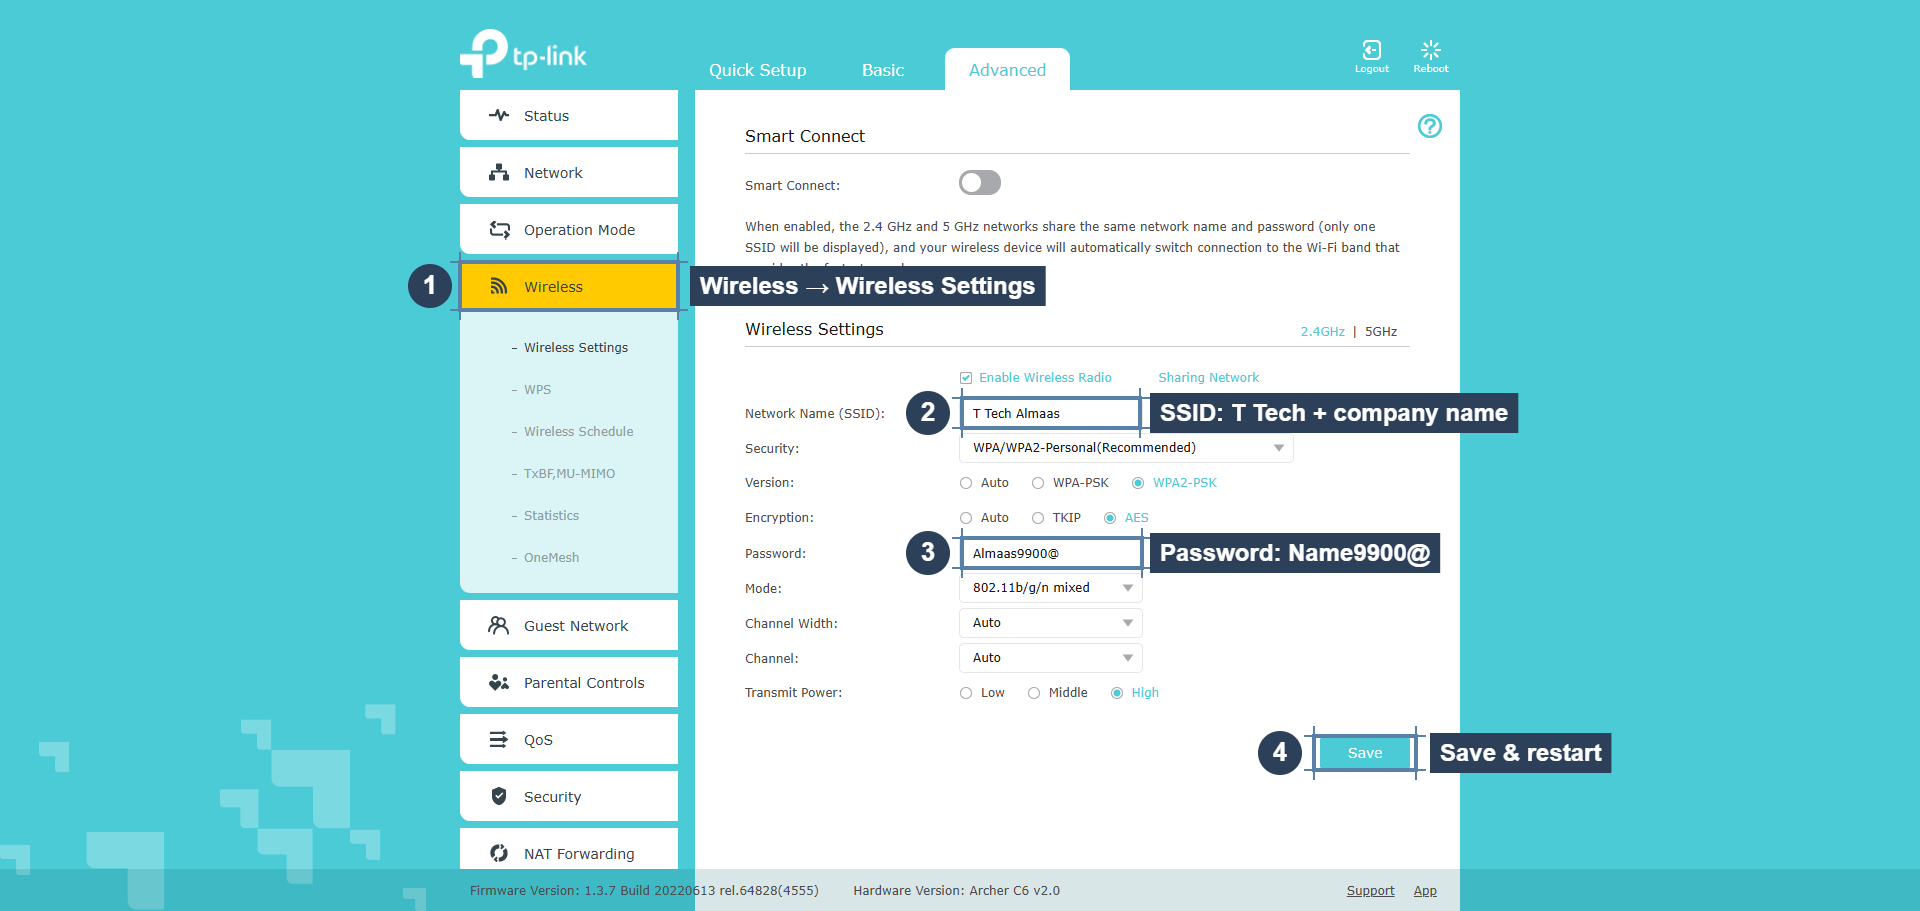
Rename WiFi & Password
  1. SSID: start with "T Tech" + company name. E.g. T Tech Almaas.
  2. Password: company name with first letter capitalized, followed by 9900@. E.g. Almaas9900@.
  3. Save, restart — router preset done.
Correct  T Tech Aliang Fish Noodles — Aliang9900@
Wrong  T Tech Aliang Fish Noodles — aliangfishnoodles9900@
Step 3
Reserve the Main Device's IP (DHCP Reservation)

Do this for the main device only (the POS tablet / controller) so it always keeps the same address and the app & printers can reliably reach it. The printers keep their own fixed IPs from the IP map (Cashier 192.168.123.181, Beverage .182, Kitchen .183) — the main device is the one you reserve on the router.

On the main device
  1. Open the connected WiFi network's settings.
  2. Set IP settings to DHCP (not Static).
  3. Set Privacy to "Use device MAC" — turn OFF randomized MAC, otherwise the reservation won't stick.
On the router (192.168.123.1)
  1. Log in → Advanced → Network → DHCP Server → Address Reservation.
  2. Click Add. Find the main device's MAC address in the DHCP Client List below (match it by client name).
  3. Enter the MAC Address, the main device's Reserved IP (e.g. 192.168.123.173), a Description like "MAIN", tick Enable This EntrySave.
  4. Reconnect the main device's WiFi (or reboot it) so it picks up the reserved IP.
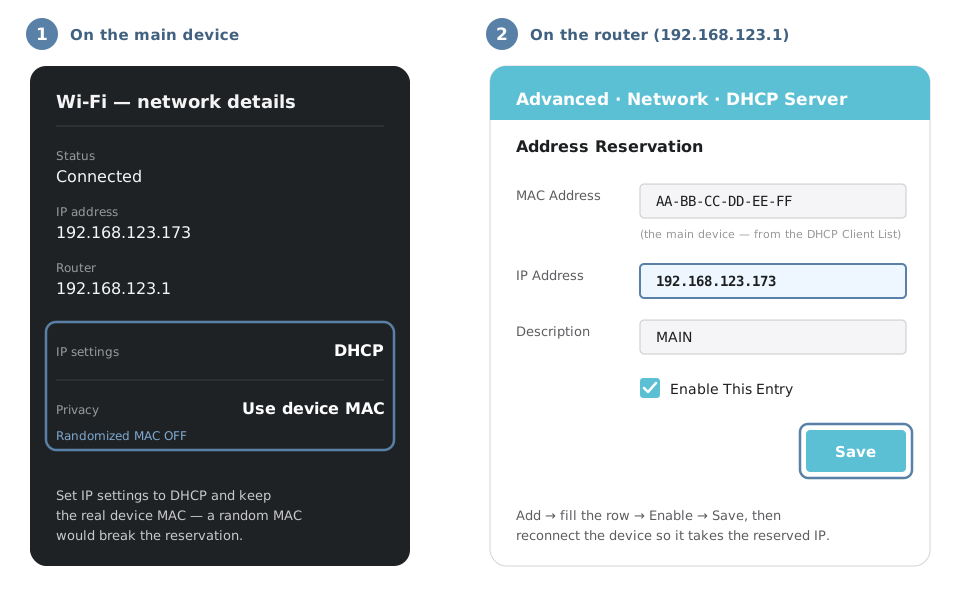
Left: main device WiFi settings with IP settings set to DHCP and Privacy set to Use device MAC. Right: TP-Link Address Reservation form with the device MAC, reserved IP 192.168.123.173 and description MAIN, Enable This Entry ticked, then Save.
Fig. 3 — Reserve the main device. On the device: IP settings → DHCP, Privacy → Use device MAC. On the router: Address Reservation → add the MAC + reserved IP (e.g. 192.168.123.173) → Enable → Save.
TP-Link admin: Network → LAN, set IP Address to 192.168.123.1, then Save
Fig. 1 — Change the router IP. Advanced → Network → LAN → set IP Address to 192.168.123.1 → Save & restart.
TP-Link admin: Wireless → Wireless Settings, set SSID and password, then Save
Fig. 2 — Rename WiFi & password. Advanced → Wireless → Wireless Settings → SSID "T Tech + company name", password "Name9900@" → Save & restart. Repeat for 2.4GHz and 5GHz.
06

Menu Import Pricing — Quick Reference

Menu must be FINALIZED before submission. Changes after import are chargeable.

Item countCharge
First 200 items (new setup)FREE
201 – 400 itemsRM 200
401 – 600 itemsRM 400
Each further 200-item block+ RM 200
Additions for existing users (per 200-item block)RM 200
Image upload (per image)RM 0.60